The display of buttons in the actions toolbar depends on the selected function. Some actions are general, others are specific to the function type (setup, data import or export).
For instance, here is the actions toolbar of the transaction management pages which display tables with the transaction list:

In the pages displaying tables and if the function authorizes it, you can add, modify or delete lines.
To create a line, click the Create button.
The editable creation page for the element is displayed.
Info
The identifiers cannot be modified later.
In the pages displaying tables and if the function authorizes it, you can add, modify or delete lines.
Double-click a line in the table to modify it or choose a line by selecting the corresponding option on the left of the table, then click the Change button.
You can access the same pages as in creation mode.
Info
The identifiers cannot be modified.
In the pages displaying tables and if the function authorizes it, you can add, modify or delete lines.
To delete a line, select the corresponding checkbox on the left of the table, then click the Delete button.
Click Yes in the confirmation dialog box.
The element is deleted.
Each type of function has its own procedure, described in the following topics:
Click theRefresh button to update the page.
To show the table content in Microsoft® Excel® spreadsheet, click the Export to Excel button.
Microsoft Excel is launched and the content is displayed in a spreadsheet with alphanumerical text and images.
- To print the current table, click Print.
A printable version is displayed.
- Before printing this version, peruse the pages to be printed and check the content, using the navigation toolbar or the zoom function.
- In the actions toolbar, click the Printer Settings button to select a printer and specify the printing options.
The setup dialog box for the printing opens up. For more information on this dialog box, see the documentation of your operating system.
- Specify the printing options, then click OK.
- In the actions toolbar, click the Print button.
The print task is launched.
Info
You can also send the table by e-mail, click Notify in the actions toolbar.
- Click Close to go back to the setup page.
In the setup pages displaying a list of settings in a table, here is the kind of Action bar that you will encounter:

You can relaunch, by command line, an existing import or export task.
- To view the command line to use, click a line to select the corresponding task on the import task page, then click the Command Line button in the actions toolbar.
The Command line dialog box appears and shows the command and all the required settings: the path of the executable file, the database, the username and password, the task ID number and the ouput log file.
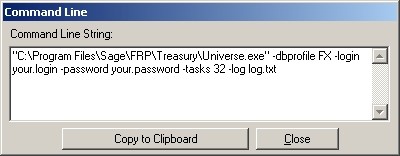
- Click the Copy to Clipboard button, then the Close button.
- In a text editor, paste the text and replace the following parameters:
- your.login by your username,
- your.login by the password associated with your username,
- log.txt by the name you chose for the output log file.
Do not change the path of the executable file and the task ID number.
- Launch the command line.
- In the command line, right-click and in the contextual menu, click the Paste option, then validate with the Enter key.
You can run an import or export task background: the task is executed background, which enables you to perform other actions on your workstation at the same time.
However, as this task is not prioritary on your workstation, its execution is slower.
To run an import or export task background, click the Process menu of the actions toolbar in the corresponding import or export page, then select Run Import Background or Run Export Background.
If you set up the remote execution of Sage XRT Treasury tasks, you can run an import or export task remotely.
The task is executed on another workstation used as a server.
You can then continue working on your workstation without slowing down your tasks execution.
To run an import or export task remotely, click the Process menu of the actions toolbar in the corresponding import or export page, then select Run Import Remote or Run Export Remote.
For more information on the setup of this function, see the documentation on the setup of remote execution.